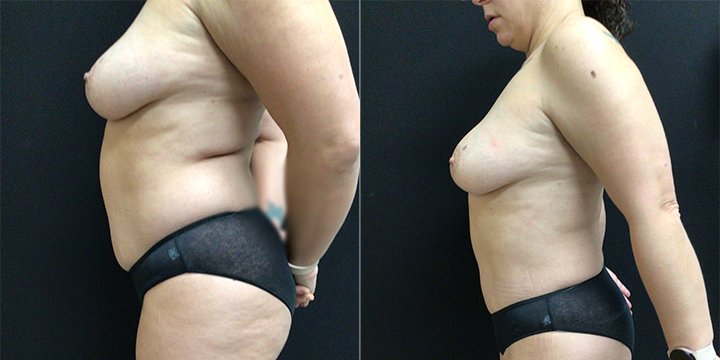
/* Base gallery layout */ .ba-hero { position: relative; } .ba-img { object-fit: cover; aspect-ratio: 3/2; } @supports not (aspect-ratio: 1) { .ba-img{ height:260px; } } .ba-control { width: 12%; } .ba-chevron{ font-size: 40px; line-height: 1; padding:.25rem .5rem; background:#fff; border:1px solid #203F7A; border-radius:.25rem; box-shadow: 0 2px 8px rgba(0,0,0,.08); color:#000; } .ba-thumbs img.ba-thumb{ width:64px; height:64px; object-fit:cover; border:1px solid #203F7A; border-radius:.25rem; margin:.125rem; cursor:pointer; transition:transform .15s ease, box-shadow .15s ease, border-color .15s ease; } .ba-thumbs img.ba-thumb:hover{ transform:scale(1.03); box-shadow:0 2px 8px rgba(0,0,0,.08); } .ba-thumbs img.ba-thumb.active{ border-color:#000; } /* Small helpers */ .ba-case .btn { letter-spacing:.02em; } .ba-thumbs { gap:.25rem; } BACK TO GALLERY GO TO PROCEDURE Body Gallery Liposuction — BEFORE & AFTER PHOTOS ❮Previous ❯Next VIEW CASE ❮Previous ❯Next VIEW CASE ❮Previous ❯Next VIEW CASE ❮Previous ❯Next VIEW CASE Liposuction Before & After — Patient #1 Close Liposuction Before & After — Patient #2 Close Liposuction Before & After — Patient #3 Close Liposuction Before & After — Patient #4 Close